06/01/23 - Radial Menu Progress
Current Mechanic State
At this time, I have managed to implement a fully functional radial menu that allows the player to switch to items depending on each hand. The menu is activated by pushing in on the thumbstick of the hand the player wants to switch with. The player then uses the thumbstick to navigate to the item they want to use (split into thirds and indicated by a highlight) and the progress bar will fill the longer the player is selecting a section and once it is full, the item is selected and the menu is automatically closed. A video of the mechanic in action is shown in the link below.
https://drive.google.com/file/d/1tPpmgTkRA7xTF0jLIG51gy2dIw8doKKp/view?usp=share...
The mechanic is in need of improvements, as seen in the video the actual menu itself is not very appealing, this is due to me creating the elements of the widget as basic placeholders. Given time I way be able to create some better looking ones. Another issue is that the radial menu is placed behind the hold objects making it easily obstructed, especially with the clipboard. This can be solved by finding the correct forward vector to move the menu closer to the player's camera.
The primary issue that I have, is that while I managed to disable the snap turn and teleport while the radial menus are open (due to conflicts with both requiring thumbstick input), once an item is selected, the snap turn/teleport may be activated directly after. In the video this is prominent with the Pen and the Clipboard being selected through it may also occur with some other items. This could be easily fixed with a delay but in Unreal they cannot be used in functions, only macros and these cannot be called through casting or reference to another object. I will likely have to create a Boolean variable in VR pawn that can act as a trigger for a delta time-based counter to use as a delay.
Development Process
Switching Items Code
Initially, I set up my code to cycle through the items with the trigger, this allowed me to create a base method of switching between the items which I though would be the most difficult part of the radial menu. If I had an integer that stored the selection and a way to change the selected item based on this integer, then I could simply change the integer variable with the radial menu's selection code once I completed it after.
To attach the item to the player controller, I needed to use something like the grab component, instead of creating another enum type for the grab component which would increase how cluttered it was, I created a new component called Inventory Component. This served to have mostly similar features as grab component while cutting out the thing I didn't need; this included the physics simulation options, the several grab types. The inventory component has two simple functions, attach and detach. They are self explanatory with the attach function attaching the item to the players motion controller and detach doing the opposite. These are shown below.
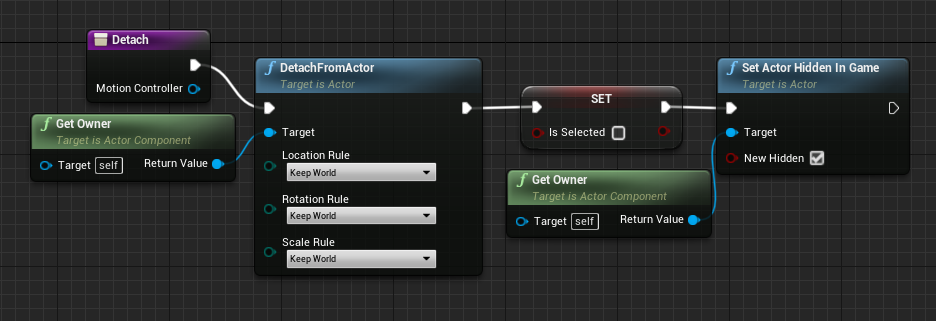

One key difference with attach is that it also rotates the item to match the players motion controller according to the location of the inventory component. This is the same code used in the snap enum of grab component. This allows the player to hold the inventory item only at a certain point which is what I intended to happen. These functions also toggle whether the item is visible in game.
The items will always exist in the game, they are just invisible and not attached to the controller when they're not selected. This isn't great for processing efficiency and could be improved by instead spawning an instance of the actor when selected and deleting it when not selected. However for this project I decided to focus more on the functionality of the component and this option would take up extra unnecessary time when programming.
Storing item references
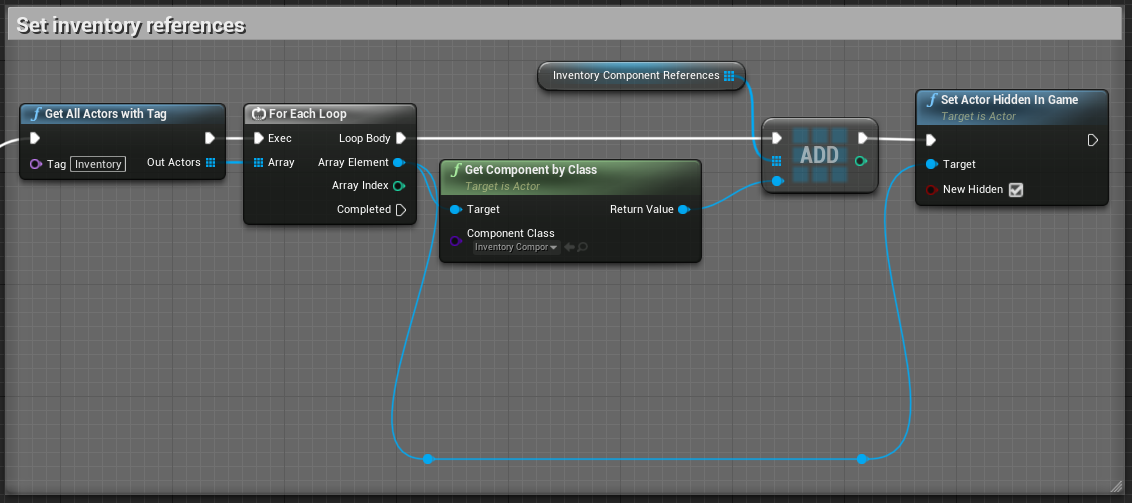
In order to access the inventory items, I created an array to store their inventory components. The below code runs once at the start of the game and serves to store all of the inventory components. I was able to access the relevant actors by giving them a specific tag, from there all relevant data is in the inventory component so that is what is added to the array. This is vital for later on when setting the inventory items. The main variable need from the component is the name enum. This is used to determine which component should be attached.
There are also two component variables used to store the refence to the active inventory item's component. These are named "InventoryComponentLeft" & "InventoryComponentRight". This is necessary for activating button presses through the VR interaction BPI (this will be shown later on).
Setting inventory items
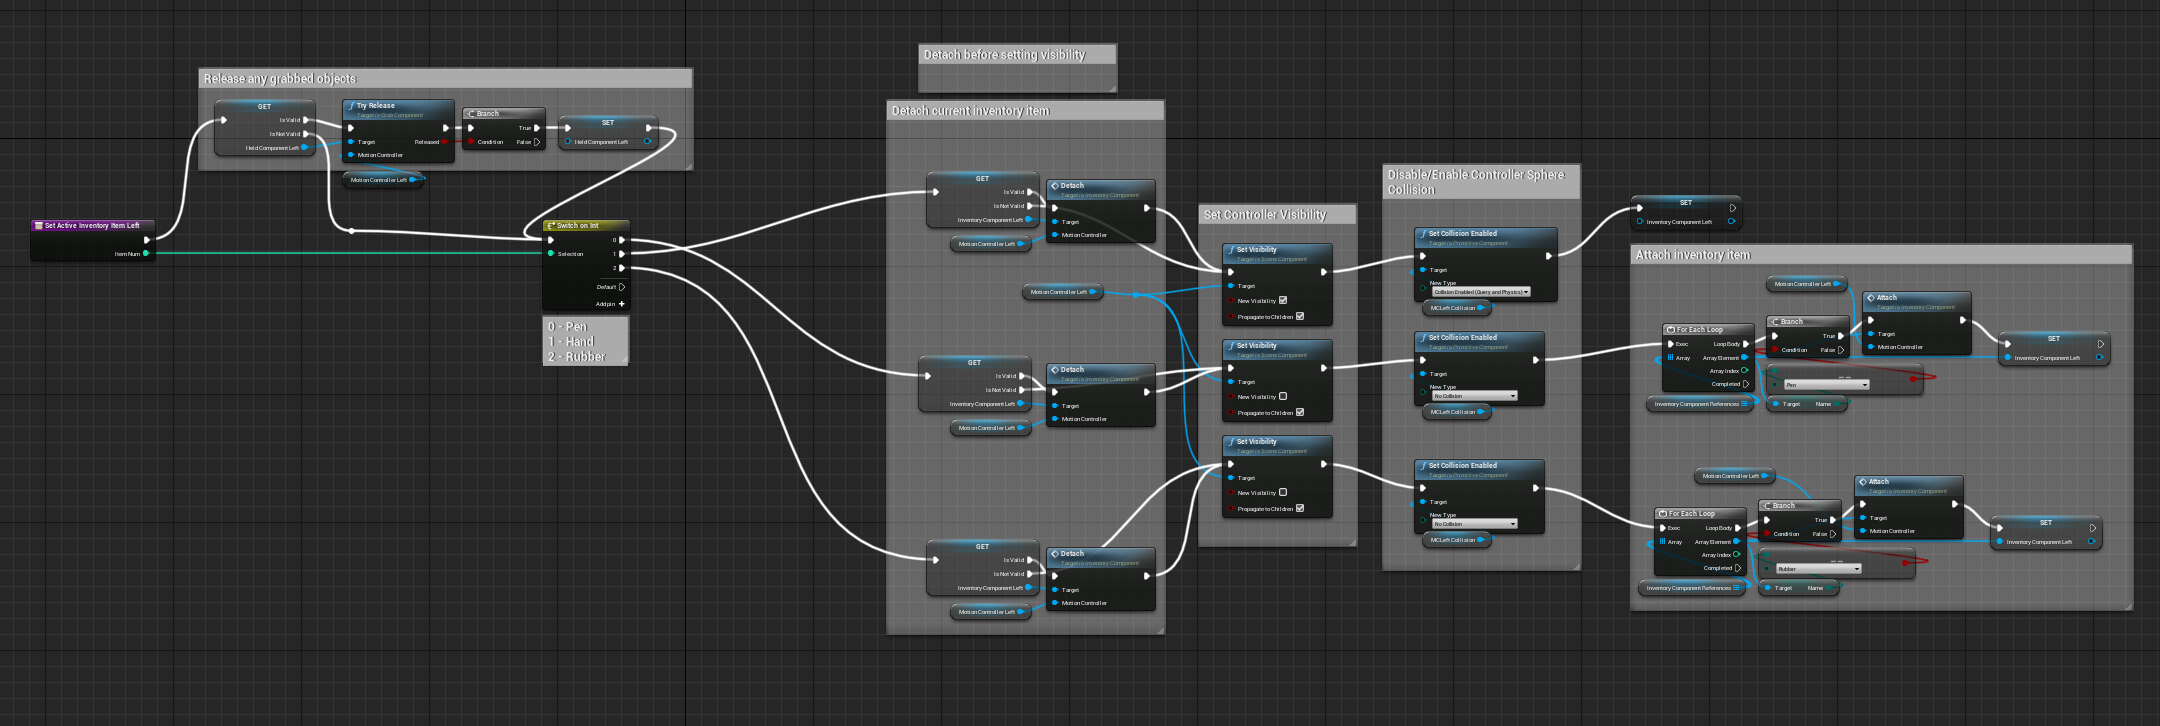
The below image shows one of the functions for setting the selected inventory item, there is another function used for setting the right hand (I split them apart for clarity). The it is split into five main sections, the order of which is crucial due to the way some nodes interact notably set visibility.
Section 1: Detaching any held objects
In order to ensure that held items weren't disappearing when the player switched items, I made any held items automatically be released when selecting an inventory item. This was done using a validated get so the process wouldn't throw an exception if no item was grabbed when the code is triggered. It allows me to check whether there is a held item before trying to access it. The code tries a release on the grabbed component before setting the component to empty. The branch node should ideally not be used I have yet to have a failed release attempt, though if it did return false I think the best idea would be to loop the process until it returned true.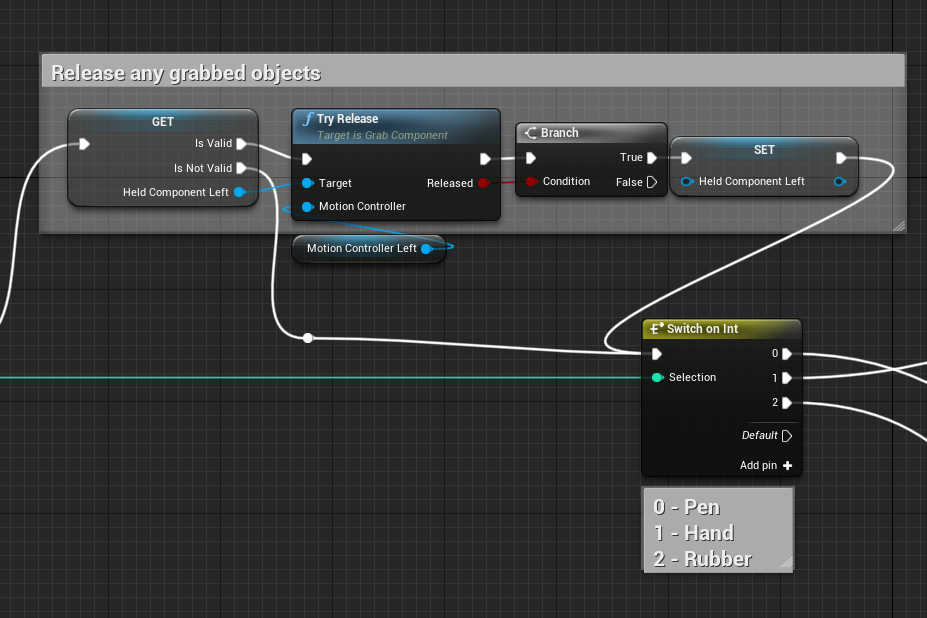
The selection number is then plugged into a switch statement to determine which item if any to attach.
Section 2: Detaching previous inventory item
The detach code is set before setting the visibility due to the conflict I mentioned earlier. When the set visibility node is used "propagate to children" must be selected to access the visualisation of the motion controller and render that visible/invisible. This also has the adverse effect of making any attached items invisible. To avoid this, the detach section is placed before set visibility and the attach section is set after. This means the inventory components are not affected by the set visibility node. Again, these are done with validated gets in the case that there are no set inventory components which happens when the default hand/controller is the previously held item.
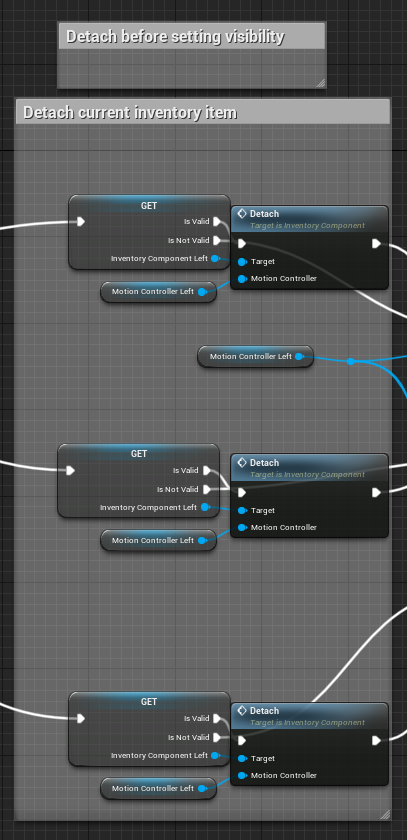
Sections 3 & 4: Setting visibility & Setting controller sphere collision
While setting the visibility of the motion controller needs to be at this point for the aforementioned reasons, setting the sphere collision could realistically be done at any point after the switch statement. This is done as the motion controller sphere can often have a larger collision profile than the static mesh of the active inventory item. I found this issue when trying to push a button with the pen active, the collision sphere was still active and was much wider than the pen causing the button to be pushed in an unrealistic way.
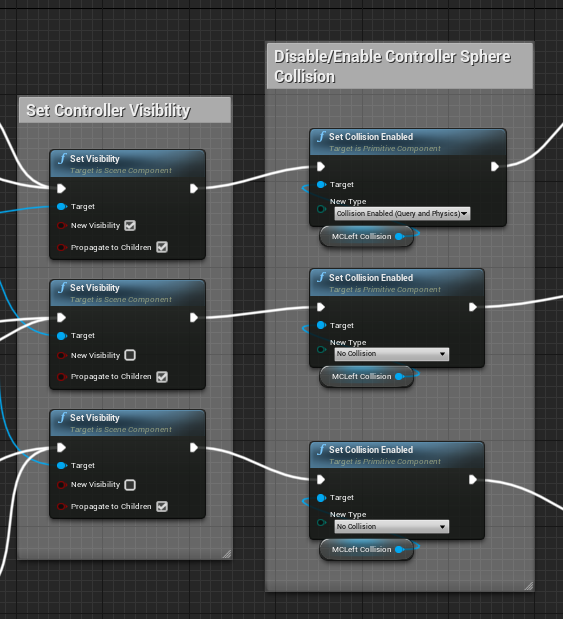
Section 5: Attach inventory item
The final step is to attach the relevant inventory item. For the default hand/controller, this just includes setting the inventory component left variable to null. For the other two items, the list of inventory component references (as explained further above) is searched for the item with the correct name enum (set in the custom inventory component). The item is then attached and the inventory component store variable is set to the relevant reference.
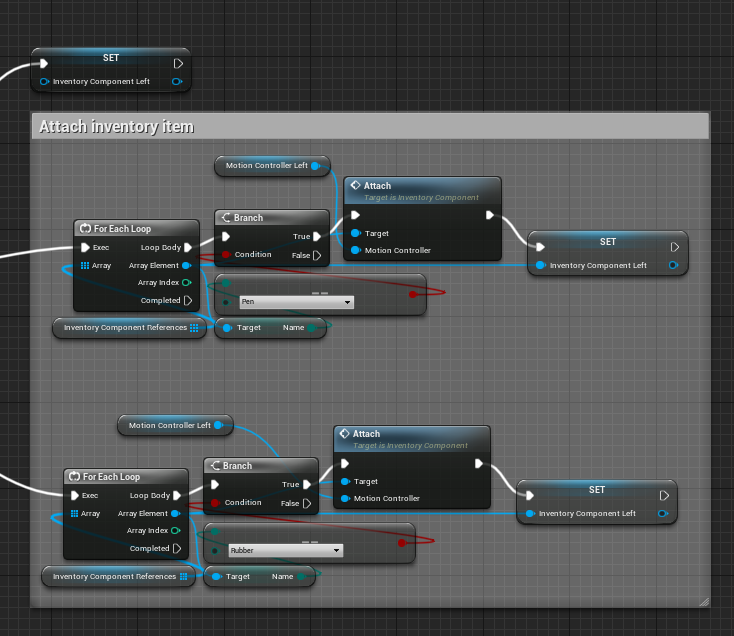
Controlling the inventory item
As mentioned earlier, having a store of the active inventory item allows the VR interaction BPI to be used to trigger button press events in the actors blueprint. I discovered this from the fire trigger in the pistol blueprint. By including the BPI interface, events can be triggered in the target blueprint depending on what controller buttons are pressed.
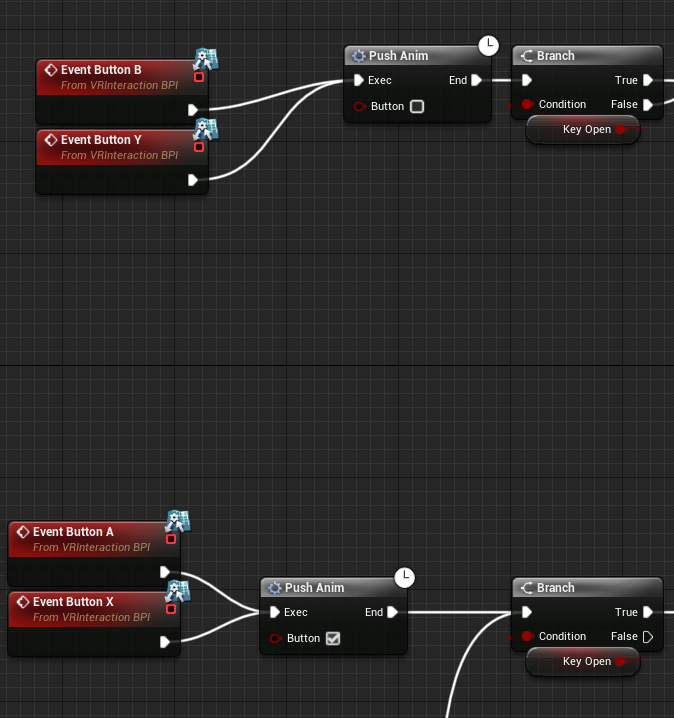
Below is the code I implemented for the ABXY buttons of the controller. It uses validated gets to check if there are held/inventory components avoid exceptions. It first checks for held components which are only active with the default hand selected, it then checks for the inventory components. Since the VR BPI is implemented in the actor not the component within it, a get owner node is used to direct the event to the correct target.
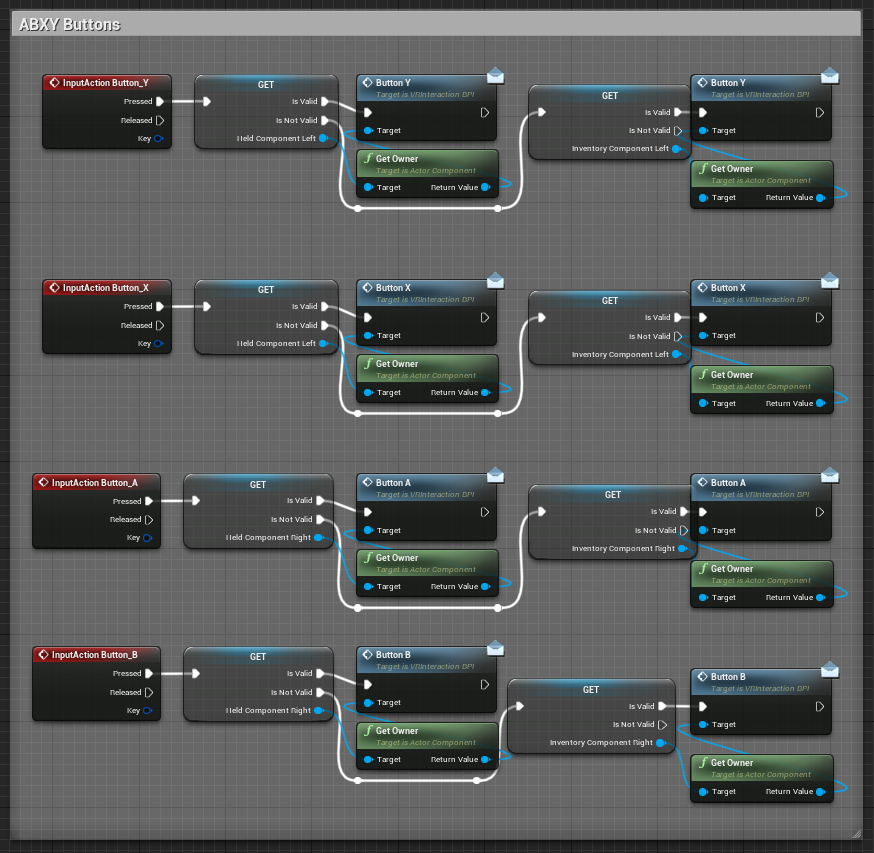
In the blueprint of the actor, interface event nodes can be created, the below is within the key fob actor. When the event in the above code is run, it will run the relevant event only in the target actor passed into the event node. So if and of the ABXY buttons are pressed while the key fob is an active inventory component, it will run the relevant code below depending on the specific button pressed.
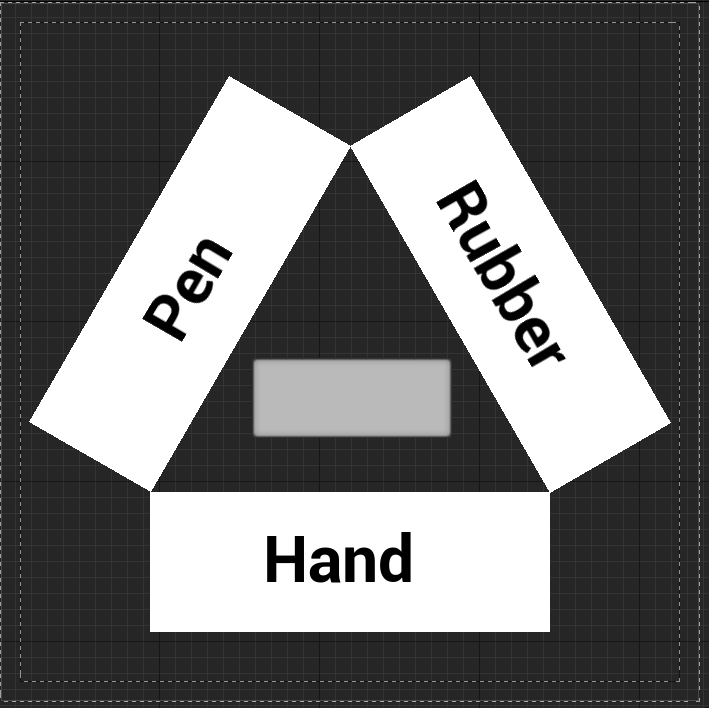
Widget Design
The base design of the widget that serve as the UI for the radial menu is just three boxes arranged in a triangle with a progress bar in the middle. This is a base prototype for what I have in mind as it is better to have base functionality before adding extra flair. It has most of the basic components I wanted, a progress bar, and three sections. My plan is to eventually have these in the form of circle segments with icons instead of text. These components serve to have all the base functionality I required and can be replaced later on.
Interacting with the widget was the difficult part, it took me a while to figure out that it had to be done in the way shown below with a get user widget object node and then casting to it.
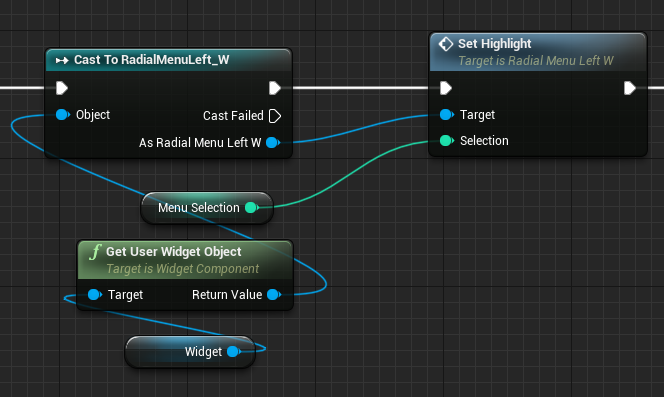
The menus have only two functions, highlighting the selected section, and setting the progress bar value.
Putting it together
Now That I was able to interact with the widget and set the inventory item given a integer selection. The menu is turned on from the VRPawn blueprint with the joystick in controller mapping I added. This is shown below.
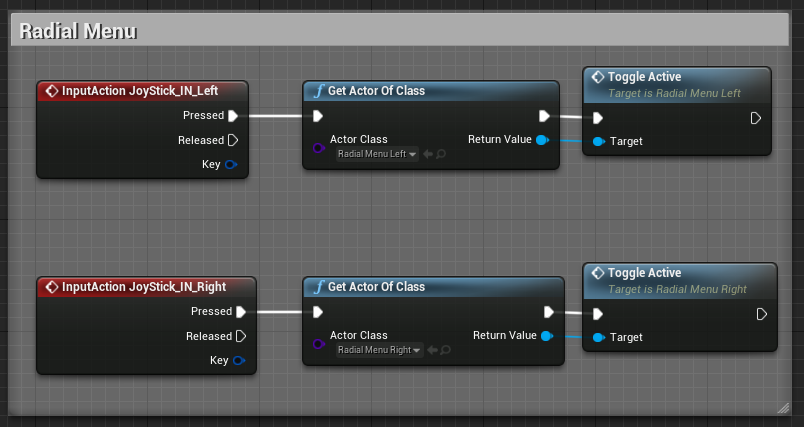
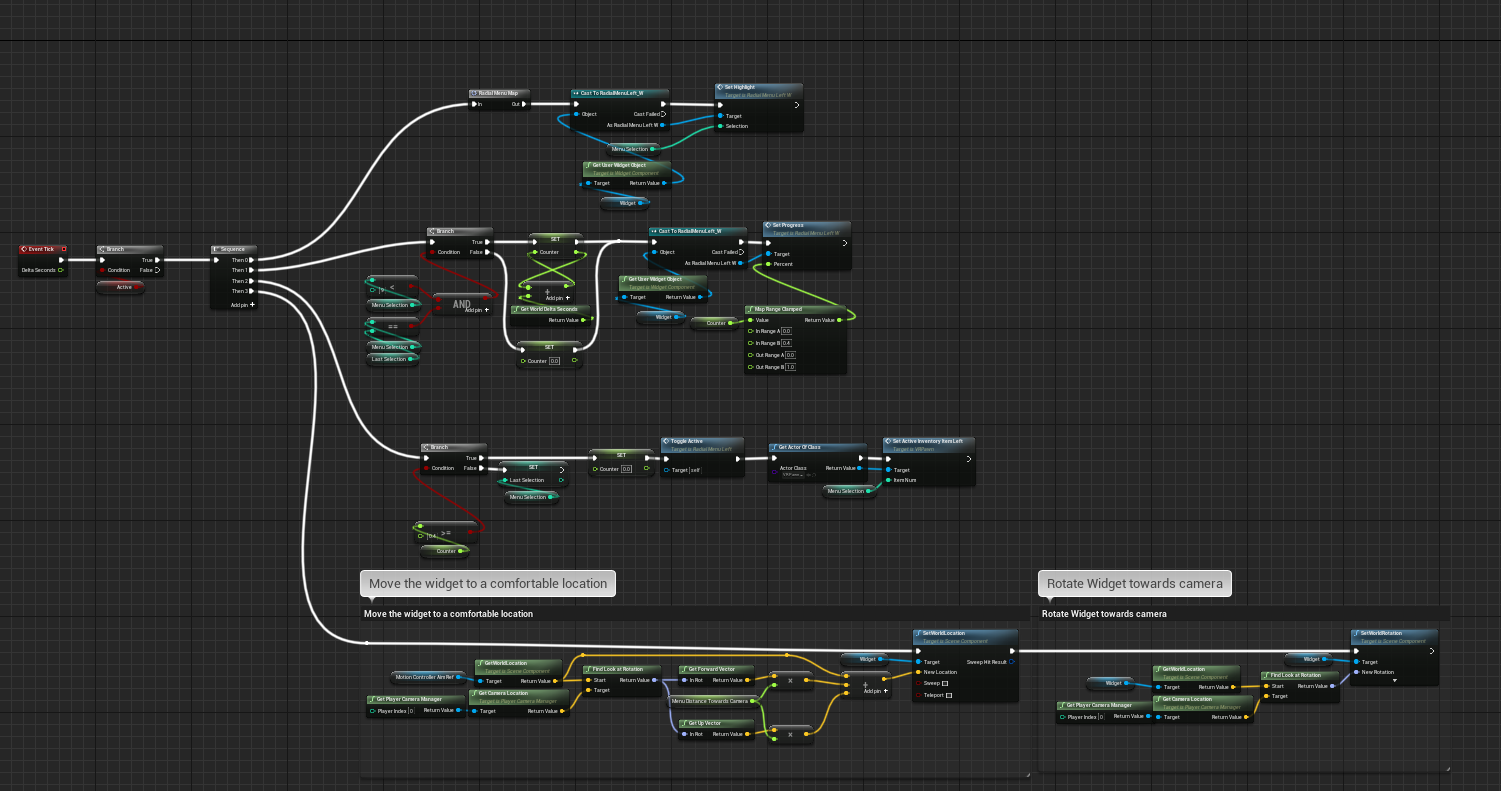
The toggle active simply sets a variable called active and sets whether the radial menu is visible or not. The below image shows the code used to track input into the radial menu, this is only triggered once the radial menu is set to active. Only the first three sections are relevant as the last is just the code copied from the default restart/exit menu to set the positioning of the radial menus widget.
While testing I found that having the menu selection trigger immediately would often cause incorrect inputs, especially from the action of pushing the thumbstick down to trigger the menu. To remedy this, I implemented a timer to check if the option was held for a small amount of time before triggering. The timer sections are 2 and 3.
Section 1
The first section is where the input is recorded using the radial menu map macro created. This sets the menu selection variable that is then used later on in the code. The the highlight for the widget is set.
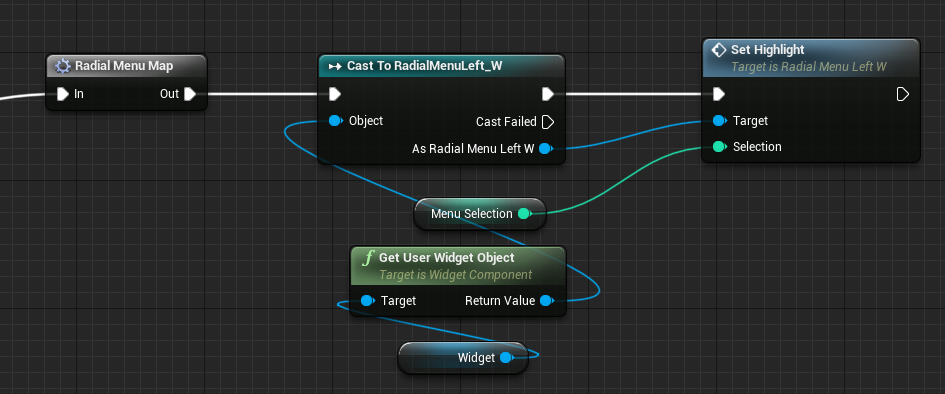
The below code is the mapping function that takes the joystick x/y input and turns it into an angle, then a selection based on thirds.
The first key section is the first branch, this check whether the joystick is actually being used using some thresholds and a bunch of or Boolean statements. If the joystick is not being used, the menu selection is set to 10. This is relevant for some later checks. From then the x and y values are put into an inverted tan 2 node to receive the angle of the joystick input. The issue with this is that the scale of this is from -180 to 180. It also has the zero at the left which would be uncomfortable visually for the radial menu. To fix this, I offset the value by 270 degrees, the first 180 to set the range from 0 to 360, and the extra ninety to move the 0 point to the top. I used a modulo node to ensure that any values over 360 with the extra 90 degree offset would be wrapped back around starting from zero. From then the value is divided by 120 to split it into thirds and the result is out into the menu selection variable. I will likely make another post about my design process for the radial menu to hopefully explain this better.

Section 2
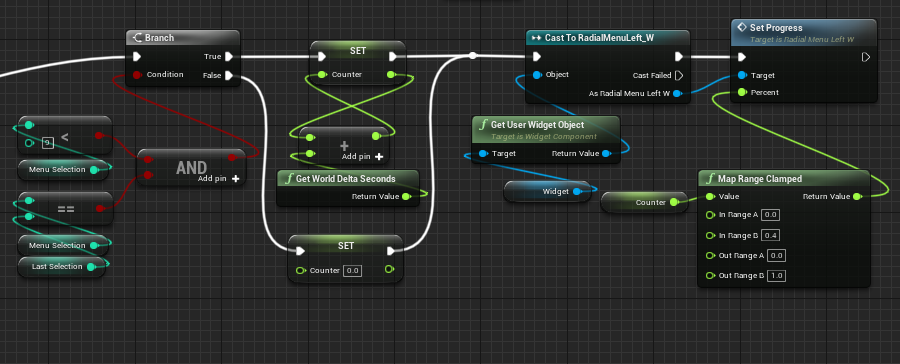
the first part of section two has two outcomes, either the timer increases, or it is reset to zero. The increase condition is only met if the menu selection is less than 9 (the selection is set to 10 if the joystick is not active) and the selection is the same as last selection. Last selection is a variable that stores the selection from the last frame. This helps to check whether the user is staying on the same selection before increasing the counter value. After this regardless of the first section, the progress bar is set using the counter's data.
Section 3
This section has two outcomes, the first is that the counter has not reached the threshold, this will cause the last selection variable to be set for the next frames calculations. However, if the counter has reached the threshold the counter is reset to zero before the radial menu is set to inactive. This is when the set active inventory item function from VR pawn is finally called, setting the item after a successful selection process.

Fixing issues
One issue that I had was that the snap turn and teleport functions (which use the joysticks) would be triggered repeatedly when the radial menu was open. This was a simple fix where I would just check whether the relevant menu was active before running the snap-turn/teleport code.
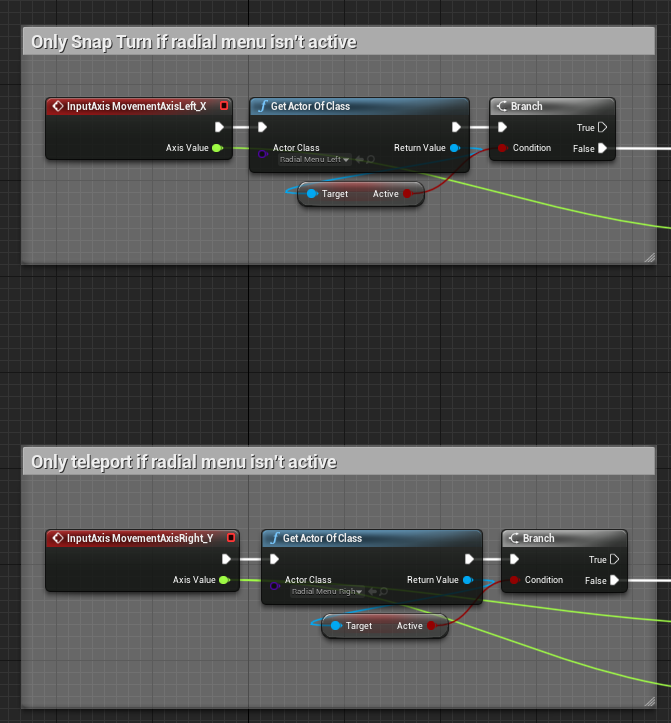
However there is still the issue of these triggering immediately after an item is selected as outlined at the start of this post. Again I wish to fix this with a delay but due to them not being available within functions I will have to find a workaround with a triggering bool.
VR Dev Blog
| Status | In development |
| Author | Georgonzola |
More posts
- 20/01/23 - Button, lever and in-game menu (final state)Jan 20, 2023
- 20/01/23 - Painting tool (final state)Jan 20, 2023
- 20/01/23 - Radial Menu (final state)Jan 20, 2023
- 19/01/23 - Button, Lever & In Game Menu progressJan 19, 2023
- 19/01/23 - World to local coordinate translationJan 19, 2023
- 06/01/2023 - Door ProgressJan 11, 2023
- 05/01/23 - Painting Tool ProgressJan 05, 2023
- 30/12/22 - BreakthroughDec 30, 2022
- 19/11/22 - Current ProgressNov 19, 2022
Leave a comment
Log in with itch.io to leave a comment.